Monday, November 30, 2009

Party Over At My 'House'!!!

A 'Blog GiveAway Party', that is!!! :D

Last week I put the question out there 'cuz I was considering hosting a giveaway here on my blog. I had decided that when my Twitter account hit 100 followers (yeah, I know, 100 big freakin' deal 'cuz everyone else has, like, 10 BILLION ~ Well, Ashton Kutcher does at least LOL But for me, 100 was a big deal) I wanted to celebrate by giving someone the chance to celebrate along with me. And I hit it last Wednesday (A few have since dropped like flys, but we won't count that!)
Soooooo...It is now time for the First Ever Pink Cupcake Arts Blog Giveaway Extravaganza!!!! :D
Since I consider a lot of the people that follow me on Twitter to by my friends, and because I like to share the things that I like with my friends, I decided that this would be the perfect chance to share some of my favorite things. And that is exactly what I am giving away, a container/bag that I have STUFFED to the brim with some of my favorite arts-y, crafts-y, super fun goodies!
Anyone wanna see a pile of all the Fabulous stuff? Nod once for yes!
Photobucket
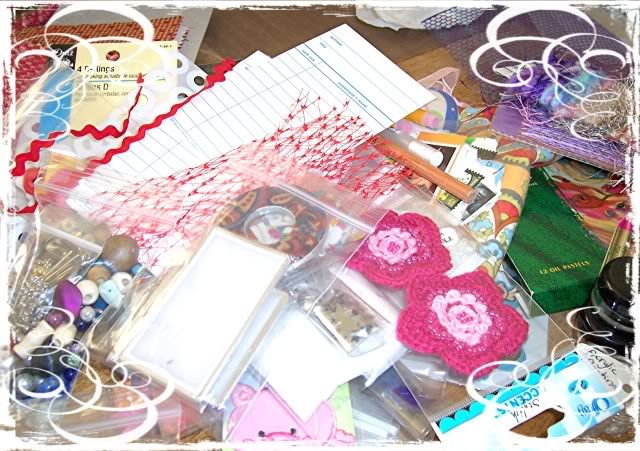
I gathered all this fun stuff from the TONS of supplies that currently take up residence in my studio. There is stuff in there for art-ing, for crafting, for sewing, for jewelry making, for....well, for just about anything you can think of and more! (I like to think that I suffer from 'Crafter's ADD' :D I like to do A LOT of stuff, but never do anything exclusively for very long LOL)
A short list of some of the stuff included in the Big Bad Pile O'Wonder is...
Calligraphy marker, Sakura Gelly Roller, sketch pencils, yards of fibers, wooden beads, paper flowers, star confetti, Prismacolor blender pencil, FQ of fabric, samples of some of my favorite glitters, embossing powders, and acrylic mediums, Twinkling H2O watercolor paints, water soluable oil pastels, grungeboard, cross-stitch kits, metal findings, assorted beads, library cards, ribbon, ric-rac, and sooooooooooooo very much more. :D

Then I attempted to stuff it all into this bag...
Photobucket
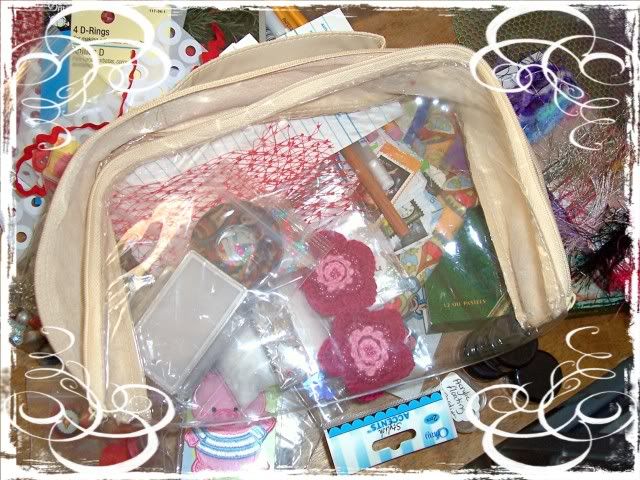
The bag is about 6 inches wide by about 12 inches long, and I'd say about 2/2.5 inches deep. It zips all the way around with a dual zipper and has a nifty little handle that you can carry it around with.

Big Surprise...It all fit (but just barely LOL :D)
Photobucket
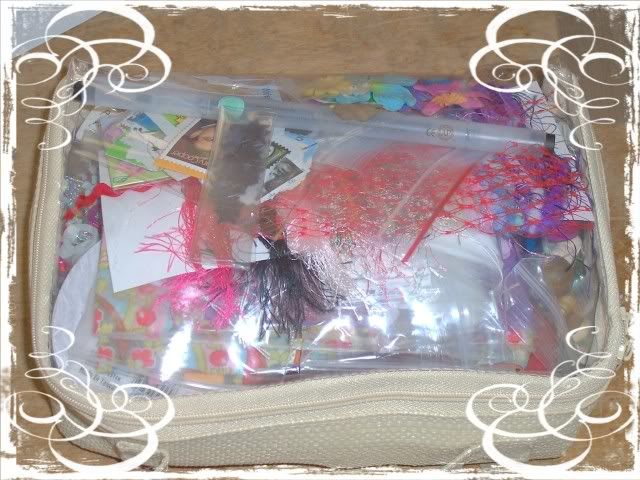
(I AM a Master Packer :nods once for yes:)

I am guessing that by now you are wondering what exactly it is that you need to do to get in on the Giveaway part of all of this, right? Well, it is VERY simple.
The chance to sign up for this GiveAway will run from December 1 thru December 10. On December 11, I will assign everyone's entries a number, and plug them into a random number generator to decide the Big Winner!!!
The person chosen will be notified by email that they have won, so be certain to leave your contact info when you comment.
Every person that comments to this post will receive 1 entry in the GiveAway. In order to qualify for any of the Bonus Entries, you have to leave a comment here first. (Please feel free to let me know what additional things you have done to get the word out there so that I can be certain to add the entries in to your total. :D)
BONUS ENTRIES ARE AVAILABLE
Every new person that signs up to Follow my blog will receive 1 additional entry.
Every new person that signs up to Follow me Here on Twitter will receive 1 additional entry in the GiveAway.
Every person that Tweets about this GiveAway will receive 1 additional entry.
And, as an added bonus :D, if the amount of individual entrants reaches 20 I will include the extra special prize of a handcrafted 'Carry-All' bag made especially for the winner by ME :D HURRAY!!
Sooooo...be sure to tell your friends, neighbors, co-workers, people on the street, the grocery checker, well, anyone that you know that likes free stuff :D Get the word out there, and JOIN THE PARTY!!!

Saturday, November 21, 2009

Wanna see what I am doing right now? :D

I signed up for a gift exchange on MotherHenna. :D
I LOVE making stuff for other people (as I mentioned before) So I decided that I would join the WONDERFUL swap going on over there. I can't wait to see who my partner is and to get started making something just for them.


Anyone want to join me? ;) You can find the info on the Mother Henna blog.

Wednesday, November 18, 2009

Possible Blog-y Giveaway?

I have been thinking about hosting a giveaway here on the ol' blog. However, I am at a total loss on what I should give away (I am not entire certain that it would be legal to offer one of the girls up as a prize ~ or that anyone would WANT to win one of them for that matter! ROFL)
SOOOOO...if anyone has any thoughts on what they might like to receive as a gift (and not, like, a MILLION dollars or anything supremely expensive) then please comment here and let me know.
:D

Monday, November 16, 2009

Which One Are You?

Pulled from an email...

A young woman went to her mother and told her about her life and how things were so hard for her. She did not know how she was going to make it and wanted to give up. She was tired of fighting and struggling. It seemed as if as soon as one problem was solved a new one arose.
Her mother took her to the kitchen and filled three pots with water.

In the first, she placed carrots.
In the second she placed eggs.
And the last she placed ground coffee beans.

She let them sit and boil without saying a word. About twenty minutes later, she turned off the burners.
She fished the carrots out and placed them in a bowl. She pulled the eggs out and placed them in a bowl. Then she ladled the coffee out and placed it in a bowl.
Turning to her daughter, she said, "Tell me what you see."

"Carrots, eggs, and coffee," she replied.

The mother brought her closer and asked her to feel the carrots. She did, and noted that they felt soft.
Her mother then asked her to take an egg and break it. After pulling off the shell, she observed the hard-boiled egg inside.
Finally, mother asked her to sip the coffee. The daughter smiled as she tasted its rich aroma.

The daughter then asked, "So, what's the point, mother?"

Her mother explained that each of these objects had faced the same adversity - boiling water - but each reacted differently.

The carrot went in strong, hard, and unrelenting. However, after being subjected to the boiling water, it softened and became weak.
The egg had been fragile. Its thin outer shell had protected its liquid center. But, after sitting through the boiling water, its insides had become hardened.
The ground coffee beans were unique, however. After they were in the boiling water...they had changed the water.

"Which are you?" she asked her daughter. "When adversity knocks on your
door, how do you respond? Are you a carrot , an egg, or a coffee bean?"

Think of this: Which am I?

Am I the carrot that seems strong, but with pain and adversity, I wilt
and become soft and lose my strength?

Am I the egg that starts with a malleable heart, but changes with the heat?
Did I have a fluid spirit, but after a death, a breakup, a financial
hardship, or some other trial, have I become hardened and stiff? Does my outer shell look the same, but on the inside am I bitter and tough with a stiff spirit and a hardened heart?

Or am I like the coffee bean? Which actually changes the hot water - the very circumstances that bring the pain. When the water gets hot, it releases the fragrance and flavor of the bean. If you are like the bean, when things are at their worst, you get better and change the situation around you instead of letting it change you.

When the hours are the darkest and trials are their greatest do you elevate to another level?

How do you handle Adversity?

ARE YOU A CARROT, AN EGG, OR A COFFEE BEAN?

Wednesday, November 11, 2009

My Hardware Store LOVES Me.

Yes, yes, they do. ((nods)) Or, at least, they LOVE to laugh at me. ROFL

Yest. afternoon I decided that I wanted to try something new. So I made the rounds through Google, looking up different projects for handmade projects that used 'odd' objects to make jewelry. I happened upon a tutorial for necklace pendants made using washers (like the kind that you put underneath the head of a bolt or a screw.) I thought it looked pretty easy (it has since become clear to me that nothing good can come from this) and the finished product looked really kinda cool. So I figured I would go for it!
I loaded the girls into the car and we raced to the hardware store, 'cuz I *thought* (again with the thinking) they closed at 4PM (they don't, they close at 5), to pick up some washers for my little project. Having been there before a time or two, I knew where the washers were located and headed back there straight away to find what I was looking for ~ the largest flat washers they carried with a large hole in the center (this is exceptionally important as the largest flat washers that they carry actually have a tiny little hole in the center and would not make a cool looking pendant.)
The lady (Yes, we have 'ladies' that work in our hardware store. They are, like, 60 and only know what they are selling you 'cuz they have been selling it for the last 40 years, not because they have ever taken the gloves off and actually *used* any of it.) behind the counter asked me if I needed any bolts to go with my giant washer purchase. And when I told her 'No', she asked me what I was planning to use my washers for? (What, 'cuz I *don't* look like the type that *needs* to buy 12 3/4 inch flat washers for the heck of it?) When I told her I planned to experiment at making jewelry pendants out of them, she looked at me like I had grown a third head (add to that the fact that I could hear one of the men behind the counter suck in his breath, and the farmer standing at the register next to me had to stifle a chuckle.) I am guessing that this is not something that occurs very often in my small town. ROFL
Anyway, I brought my heavy ass bag of washer home and started to follow the directions. I didn't have some of the supplies that it called for, but I thought 'Surely something I have will work?' And it did, fairly well.
Let me tell you what I learned...
E6000 adhesive is HORRIBLE. It clearly warns you on the tube (and on the packaging, and everywhere else) that you should only use it in a well ventilated area. Fine. What it doesn't tell you is that the 'well ventilated area' better be smack in the middle of a open air park and you had better have someplace else to go for the next 2 days 'cuz that's how long this stuff is going to take to dry and let off fumes while it does. It also includes the standard 'This product contains stuff that has been known to cause cancer in the state of California' warning. (Now, if you are anything like me, you are probably wondering why exactly it is that the ingredients manage to cause cancer in California, but not anywhere else? ROFL)
It also 'strings' when you use it. So if you apply the requisite 'dab' that you might need to seal something (say the opening of a jump ring that you don't want to come open again) and you just touch the little end of the tube to the thing you are gluing. You will pull back the tube and have this big, long, stringy line of wet glue that comes with it. Not to mention that when you try to clean up all the glue that you inadvertently get EVERYWHERE, it rolls/balls up like dirty rubber cement that WILL NOT come off your fingers.
It gets everywhere. It sticks to everything. And it REEKS!! Needless to say, that washer was destined for 'File 13' before the glue had even dried.
On to the scrapbooking adhesive by 3M. WHOO!! to the HOOO!! This stuff worked awesome. Not to mention the no strings, no smell, and easy clean up. I was a bit worried how the paper would glue to the metal, but it worked like a charm. So I was good to go there.
Once the first washer was dry it was time to start with the 'resin'. Now, I am not a huge fan of 'smelly' projects, so most of the time I don't use actual resin (especially when I don't have a TON of projects that call for using it.) I just use either Diamond Glaze or Glossy Accents It gives the same effect without the massively smelly, long ass, drying time. And honestly, I don't worry a whole lot about things like 'yellowing' or 'fading' or anything like that 'cuz I don't expect to still be wearing/using the things that I make by the time that kind of stuff occurs.
So, I take my paper covered washer and I cover it in my pseudo resin. Then I set is aside to dry overnight thinking that would be enough time. (Again with the thinking! I seriously need to QUIT that.)
When I wake up this morning to check out the finished product I find that the Glossy Accents I used to cover it has dried to the 'touch'. Touch meaning that if you don't put your FINGERNAIL into it, you should be good. I, however, was not so lucky and gouged a large HOLE into the shiny surface of my washer pendant (kicks self once.) Add to that the fact that the Origami paper with the lovely print and flowers I chose for my project, which I had the forethought to back with another heavier piece of paper, has absorbed some of the moisture from the Glossy Accents. Thus, making the Origami paper an odd see through kind of paper with flowers (kicks self twice.) And the paper I chose to go underneath the Origami paper with the flower, has bled it's color into the Glossy Accents (which should have dried to a *clear* finish, but dried to a bright HOT PINK color 'cuz the paper bled. Ask me why I couldn't just have used WHITE freakin' paper!!??!?! ~shakes head~)
Sooooooo...there goes washer #2 into the trash. And I go back to square 1 (kicks self for a third time.)
I have learned some things though. Mostly things like...Jewelry is meant to be PURCHASED; not MADE (or at least NOT BY ME.)
Glossy Accents takes a LONG time to dry (but it does not STINK.)
And, last, but certainly not least, when in the hardware store purchasing things for 'arts-y' type projects it is always best NOT to tell the little ol' ladies behind the counter what you are *really* intending to do with their stuff lest you cause them to take to their beds from the horror of it all. ;)

Monday, November 9, 2009

Soooooo...Wanna see my Charm Bracelet? ;)

Way back in August I blogged about making these fairy bottle charms for a Charm swap on ATCsforAll.com I LOVED making them and was so happy to send them in for the swap. But I was equally just as excited to see what I would receive in return :D And, let me tell you, the span of time between August and November was a L-O-N-G wait LOL
Anyway, I opened the mailbox Saturday night when we got home from my parents' house to find a nicely padded bubble envelope had arrived just for me (all the way from the UK.) It's a good thing that I was sitting down when I opened it, 'cuz if I hadn't been I might have woken up the girls when I fell over in amazement at the wonderful variety of artwork I received. I was so pleased, and I couldn't wait to get them onto a bracelet (although the arrangement and the findings used to attach them will likely be changed as time goes by. :D)


In the order they appear on the bracelet:
A Fairy Bottle charm by LisaB
A Three beaded blue/green charm (2 crystal, 1 handmade clay) by susietex
An Altered Scrabble Tile charm featuring a Fairy's face by The Mad Catter
A Three part charm featuring large spangle sequins, a glass bead, and a metal 'Inspire' charm by messmaker
A square charm featuring a mini Tarot card (The Hierophant) by spaine
A 'Death's Head' wrapped Leek button by Gina-B
A Altered BottleCap charm (featuring an awesome medical textbook face image) by DaDreemer
A Heart shaped charm by icequeen07
A square charm featuring a cool cat face by corduroy cat
And last, but not least
A dangling charm featuring a clay Flower bead by SunSwirlGirl

There are 10 in all, and they make a fantastically interesting bracelet. :D
I can't wait for the next charm swap, so that I can expand my collection and gather more great art charms from artists around the world!

Thursday, November 5, 2009

The LONG awaited STUDIO TRANSFORMATION post!! Part IV

The final installment in our Saga!

Day 4 -- The End

After several trips to the hardware store for the correct stuff (The first one would have done it if it hadn't been for the fact that the person that owned the table before me used a freakin' hammer to put it together when the bolts wouldn't go in easily on their own!) and a couple more hours of throwing stuff out cleaning up. I FINALLY had a place that I could call my own!! A place that I could create in. I wanted to spend time painting in there and crafting in there and making friends with my machines again. Hell, let's be honest here, I wanted to *MOVE* into there!! It was AMAZING!!
Photobucket
The sheer amount of stuff that I threw out to make it possible was totally worth it.
Photobucket
Every single, agonizing, 'I'm not sure this was a good idea.' moment was totally worth it.
Photobucket
Gettin' by with a little help from my friends (Hello!! A4A!!) was totally worth it.
Photobucket
All the frustration, sweat, tears, feeding my girls PB&J and cereal and shooing them out for 3 days, late nights w/ 3 hours of sleep, totally worth it.
Photobucket
Nearly breaking my foot while setting up the table was totally worth it too.

I cannot tell you how much I LOVE having a studio. How comfortable it is to be somewhere that is dedicated to the creation of beautiful things. Cleaning out this room was quite possibly one of the best things that I have done for myself as an artist. It was exhausting. It was long and frustrating. It was soul cleansing. And I am very thankful to have had the opportunity to share it with you all.

The LONG awaited STUDIO TRANSFORMATION post!! Part III

On to day 2!!

Day 2 -- The Light at the end of the tunnel!!

It was all I could do to convince myself that I *wanted* to go back into the disaster area on the morning of day 2. But, by the time I went to bed that night, I could see the creative place I had been envisioning this whole time beginning to emerge from the rubble.
I could finally see the floor!!! It was PHENOMINAL!! There was still a TON of work to do (including putting up that massive table you see in the pictures :D) But the end was so much closer than the beginning, and I could almost taste it.
Photobucket
Photobucket
I decided that I wanted to put all of my sewing machines onto one table so that they weren't all over the place (and so that the girls would have a desk to do their homework on.) But first I had to clean off the table for them to go on (Yes, their was a table underneath all that crap.)
Photobucket
(See!! A Table!! LOL)
Anyway, by the end of day 2, I still had some work to do and I needed to run to the hardware store to get bolts and nuts and stuff to set up the big table I intended to use for my art stuff (This table had taken up residence in my hallway for about a year or so in pieces waiting for me to get the studio put together and get it set up.)
I was actually breathing a bit easier when I went to bed that night 'cuz I was starting to feel like I was accomplishing something great :D

The LONG awaited STUDIO TRANSFORMATION post!! Part II

(That last one was kinda long and I thought it might be better to break it up into a couple posts, covering each of the 3 days separately :D)

Day 1 -- What a NIGHTMARE!!!
It started out okay, I guess. I originally had thought that if I moved everything out of the back corner of the room and then cleaned my way towards the door it would make much more sense. However, what I didn't factor in was the sheer amount of crap I was going to be throwing away, the fact that I still needed to be able to get out the door to throw said crap away, or the fact that there were things in that room that I couldn't throw away if I wanted to (Namely all the junk that the Man Child that I call my husband just stuffed into there after he lost his job the last time ~ He drives a truck, so when he cleaned out his truck he just brought all the crap home and shoved it in the room. When he started driving again, he didn't take it all back out with him. His reasoning -- this new truck is smaller than his old one was. BOO-freakin'-HOO!)
At the end of the first day, the room actually looked WORSE than it did before I began. I seriously began questioning if I had made the right choice in cleaning it out, or if I should have just left well enough alone.
Photobucket
Again, the FABULOUSNESS that is A4A was there to talk me down from the ledge. ;)
The corner I started in was messier than when I started, the fabric pile on the floor in front of the Wall O' Fabric was higher than when I started, and the pathway to the door was non-existent at this point.
Photobucket
Photobucket
At this point, I just shrugged my shoulders, turned out the light, and went to bed.

The LONG awaited STUDIO TRANSFORMATION post!!

If you say that with a slightly deep, echo-y voice and add the sound "Ahhhhhhhh" like they do in the movies, it makes it all much better :D

A few months ago, I posted about cleaning out my studio (Well, at that time it was just a dining room with not a whole lot of potential. However, I did have hope :D ) Then I *swore* that I would post pics and illustrate the process for you. But I never quite managed to have enough hours in a day to get it done (yes, it does take me a long time to figure out how to do all this stuff. I am NOT technologically inclined.)
Well, guess what Peeps!!?!??! I FINALLY have some time on my hands and will be glad to introduce you to my studio as it was a couple of months ago :D (I'm trying something a little different here with the whole photo thing, so hopefully it works. If not, I will have to go back to the ol' drawing board.)

A little background for ya here, we moved into a duplex about 3 yrs ago that had what the landlord calls a 'dining room'. Originally, we had intended to use it as a third bedroom, but found that the fact that there was no closet in it made it a bit inconvenient for whom ever was stuck in it (oh yeah, that and the room itself has no door. Not that we ever close the doors, but it is nice for a bedroom to have a door.) So we just used it to store junk er, stuff in. I also used it as a sewing room (I like to make clothes and collect fabric. I needed a place to do that. Voila, dining room = perfect.)
After 3 yrs or so of storing stuff (and by 'storing stuff' I mean taking anything that didn't have a place to be or junk that we didn't need/want/use any more and shoving it into the room to be dealt with at a later time) things had gotten a bit, shall we say, out of hand. And it looked something like this...
Photobucket
(Note that the mess LITERALLY comes clear to the doorway, so in order to get into the room, you have to step over stuff and hope that you have L~O~N~G enough legs to find the floor on the other side. I didn't take any pics of this phenominon or of the mounds of fabric on the floor in front of my 'Wall O' Fabric')
This is the Wall O' Fabric...
Photobucket
If you look closely in the dim light you can kinda see the floor in the background. It was covered with crap stuff just like the rest of the room was.
I decided that I was going to clean it out and turn it into the studio I had always intended it to be no matter what it took (If I had known what I was in for when I started, I *might* rather have just shacked myself up on the couch and watched TV for the next 3 days LOL)

I figured that I would need serious encouragement for this one, so I enlisted the help of my friends at A4A for some hand holding moral support and reassurance that this would all be worth it in the end. (LOVE it there!! They are FANTASTIC people. You should check it out, if you haven't already. :D ) And then I braved the abyss...